• 0 items$0.00
  • Skip to primary navigation
  • Skip to main content
  • Skip to primary sidebar
  • Skip to footer

Hands Occupied

Contemporary yarn crafts by Heidi Gustad. Knitting, crochet, latch hook and macrame.

  • BLOG
    • Knitting
    • Crochet
    • Latch Hook
    • Macramé
  • ABOUT
  • Shop
  • Studio
  • Nav Social Menu

    • Facebook
    • Instagram
    • Pinterest
    • RSS
    • Twitter
    • YouTube

Stenciled Coffee Table Makeover

March 19, 2014 7 Comments

Stenciled Coffee Table Makeover at Hands Occupied

I got to try one of the new Stencil1 stencils this week, which I was really excited about because I’m a fan of Ed Roth, the designer behind the line. He’s known for bridging the gap between street artists like Banksy and craft world faves like Martha. In short, this line is right up my alley. I’ve had a sad, sad, sad coffee table lying around for years, and these larger stencils were just what the DIY doctor ordered for it.

Supplies

old coffee table
sandpaper or power sander
window scraper/razor blades (optional)
primer
FolkArt Multi-Surface Paint
sponge spouncers
waxed paper or silicon craft mat
Stencil1 Small Asian Dots Stencil (available at Jo-Ann Fabric & Craft Stores)
masking tape
measuring tape
pencil

Directions

Phase 1: Prep Table
(and a bit about my bummer of a DIY surprise) 

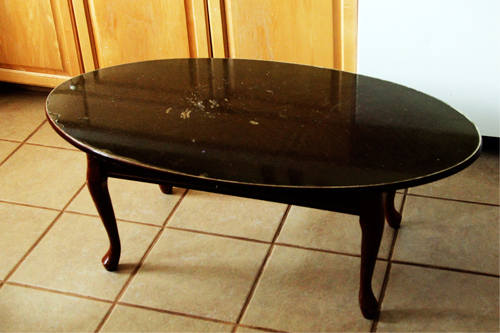
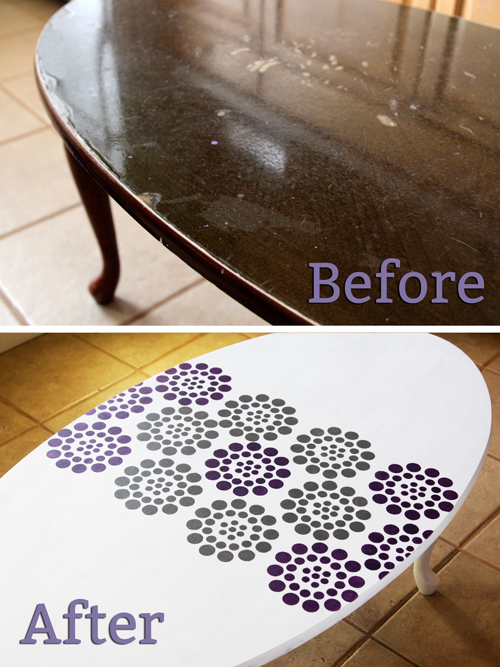
So this was my nasty table just a few days ago. Cracked, worn at the edges, some varnish worn off, a handful of paint splotches here and there… the kind of wear you’d expect out of a coffee table gotten for free in college that’s been used way too many times as a crafting surface. But I’d kept this thing on hand for a makeover project for years because it had a pretty woodgrain pattern on top.
Stenciled Coffee Table Makeover

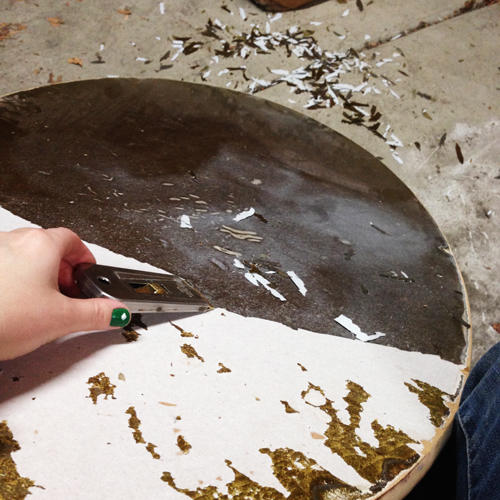
The first step was to sand off the varnish from the table. I hit a bit of a roadblock when I realized my tabletop had a weird plastic, non-varnish layer stuck HARD to it. The solution for me was a window scraper that uses razor blades. I basically needed something that could slide under the edge of the plastic and pop it off. As I worked, it became clear that the super lovely woodgrain pattern on the top of my table was just a big sticker held down by that strange plastic. Wah wah… Good thing I had a makeover planned for it in the first place!
Stenciled Coffee Table Makeover

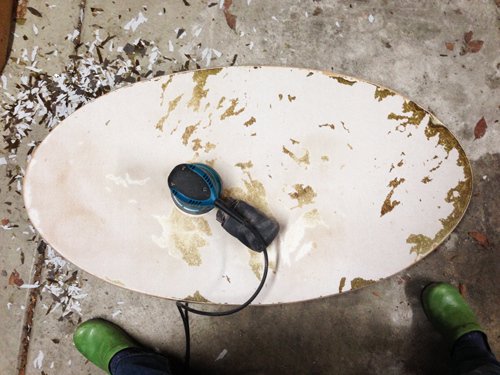
Ok, so if you are working with a normal table without strange stickers and plastic, your job will be much easier – just sand off the varnish. If you want, you can get a solution to paint on varnish to dissolve it, but I sometimes like doing a physically-involved project, so I whipped out the ole power sander.
Stenciled Coffee Table Makeover

After you’ve sanded everything off, paint your table with a layer of primer and let dry. Now you’re ready for the fun part!

Phase 2: Stencil!

Gather your stenciling supplies.
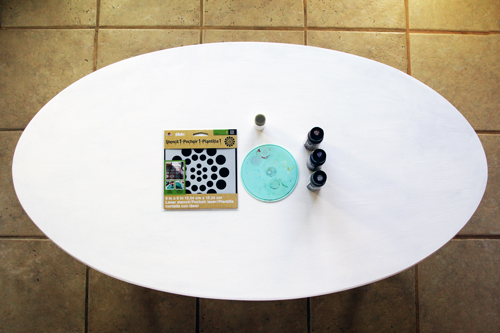
Stenciled Coffee Table Makeover

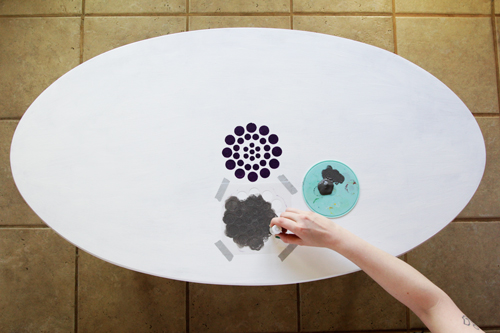
Using a tape measure, find the center of your table and lightly mark it with a pencil. Line up your stencil on it and secure with masking tape. Squirt some paint onto a mat or waxed paper, dab your spouncer in it, wipe excess paint from your spouncer onto the mat, and dab paint all over the stencil, being careful not to let paint leak under it.
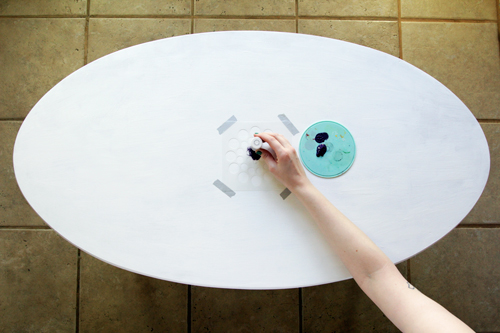
Stenciled Coffee Table Makeover

Carefully remove your stencil and rinse it off, as well as the spouncer. (The stencils are mylar, so they’re super easy to rinse off, btw.) Before moving on to the next stencil, make sure your stencil and spouncer are both completely dry. As I’ve said in other stenciling tutorials, you’ve got to work with a dry spouncer every time to avoid diluting your paint and affecting how it will turn out.

Next, measure and mark where you want your second stencil to go and again secure it with tape.
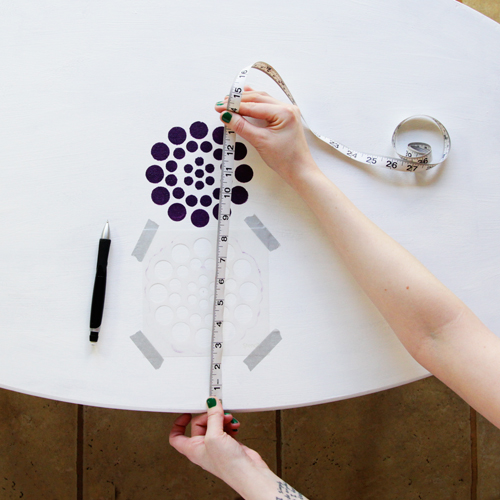
Stenciled Coffee Table Makeover

Stenciled Coffee Table Makeover

Repeat the spouncer painting, stencil and spouncer cleaning, measuring and marking until you’ve achieved a design you like for your table.
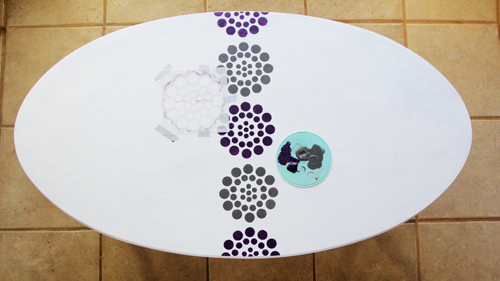
Stenciled Coffee Table Makeover

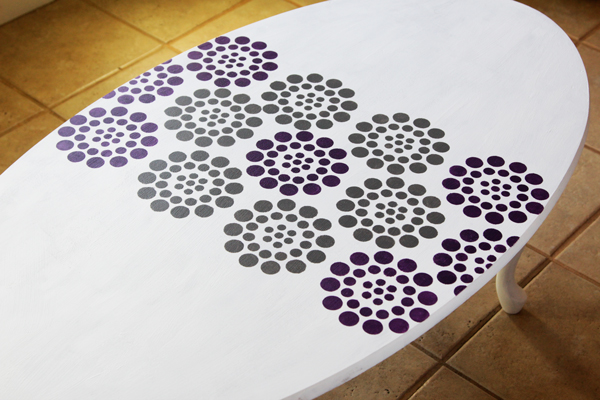
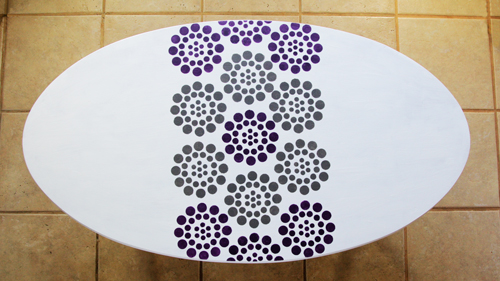
I used light gray and eggplant colors for my design, and I like how it turned out!
Stenciled Coffee Table Makeover

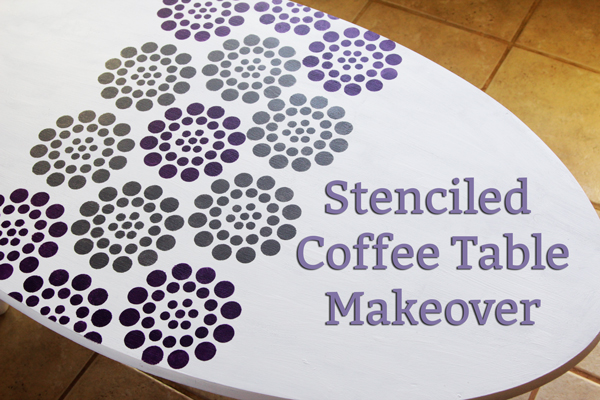
The design is kind of like an uber-modern lace detail right down the middle of my newly-not-hideous coffee table. I tried to mimic the center motif of the stencil in placing my gray circles since they made me think of flowers and beehives, which are personal faves.
Stenciled Coffee Table Makeover at Hands Occupied

Look at the difference! I can’t believe I tolerated the janky sad table as it was for so long – we’re talking like 5 years. What was I thinking?
Stenciled Coffee Table Makeover at Hands Occupied

What do you think? Love it? Hate it? What would you do differently? I love hearing inspiring ideas from you guys. :)

This post was written as part of a campaign with The Blueprint Social for Plaid Crafts. All opinions are my own. To learn more about Plaid products, check out their Plaid Palette Blog, Pinterest, Facebook,Twitter, YouTube, or Instagram!
Filed Under: Giveaways, Reviews & Sponsored, Home Decor, How-to Tagged With: banksy, coffee table, diy, ed roth, furniture, home decor, makeover, paint, refinishing, sanding, stencil1, stenciling

About Heidi

Heidi Gustad is an artist, author and crafts designer specializing in knitting, crochet, latch hook and macrame. In addition to running the Hands Occupied Blog and Pattern Shop, you can find her making videos & co-hosting the Very Serious Crafts podcast.

Previous Post: « How to Block a Knitting Project
Next Post: Weekly Reader »

Reader Interactions

DID YOU LIKE THIS POST?
Visit similar articles...

  • How-to: Upholstered Arm Rest End Tables | Hands OccupiedHow-to: Upholstered Arm Rest End Tables
  • Wild about woodWild about wood
  • How-to: Ginormous Metallic Canvas ArtHow-to: Ginormous Metallic Canvas Art
  • Robin’s Egg Nest BraceletRobin’s Egg Nest Bracelet

DON’T MISS ANOTHER UPDATE

Comments

  1. Carol

    March 19, 2014 at 9:59 pm

    Wow! It turned out great.

    Reply
  2. Carissa Bonham

    March 19, 2014 at 10:26 pm

    I love this! It turned out awesome

    Reply
  3. Leslie

    March 19, 2014 at 11:46 pm

    Wow! That came out awesome!!!!

    Reply
  4. Amy Anderson

    March 22, 2014 at 3:20 pm

    I LOVE this!! Such a great job!

    Reply
  5. Jennie B

    April 7, 2014 at 3:39 pm

    Love it! Would you recommend putting a layer of clear varnish over the top for added protection? I’d be worried that the paint would scratch or chip easily.

    Reply
    • Heidi

      April 7, 2014 at 4:34 pm

      Yes! That’s a great idea to make the table last!

      Reply
  6. Unique

    March 15, 2015 at 3:04 pm

    Very nice.Loved this.

    Reply

Leave a Reply to Carol Cancel reply

Your email address will not be published. Required fields are marked *

This site uses Akismet to reduce spam. Learn how your comment data is processed.

Primary Sidebar

Heidi Gustad from Hands Occupied / Craft Book Author and Knitting, Crochet, Latch Hook and Macrame Designer

Hi! I’m Heidi, an author, yarn craft designer and content creator specializing in knitting, crochet, latch hook & macrame. My work unapologetically features primary colors and vintage-meets-modern style. My first book, Latch Hook: 12 Projects for the Modern Maker, is now available!

work with heidi

UPDATES BY EMAIL

Get a free pattern + biweekly updates sent to your inbox.

Let’s be friends!

  • Facebook
  • Instagram
  • Pinterest
  • Twitter
  • YouTube
Latch Hook by Heidi Gustad

Footer

INSTAGRAM

handsoccupied

Craft book author & content creator in love with primary colors & vintage vibes. / #latchhookbook out now!
.
knitting, crochet, latch hook & macramé

Heidi Gustad 🧶✂️
There’s an update on the blog today, & it’s ab There’s an update on the blog today, & it’s about how I’m going to take the next 2 weeks off to rest & recharge. ☺️🧶 No new content for y’all means I can also take a moment to zoom out & plan what’s next. Link is in bio. 
.
.
A note on Very Serious Crafts: In the post I discuss stepping away from the @seriouscrafts podcast to give myself more time to devote to some minor medical issues. Don’t you worry - my health will be fine, & @molliejohanson @redhandledscissors and I are still pals, and after a short break of their own, the podcast will be back! Just sans moi. 💁🏼‍♀️😆 
.
.
See you in a couple weeks! ✌🏻#handsoccupied #knitdesign #craftdesign #sofadedsweater
Been a little quiet this holiday week, as it shoul Been a little quiet this holiday week, as it should be. ☺️🎄The past few days have been filled with a lot of catching up on festive zoom calls & raising toasts to the camera. 🥂 Connecting with people has been a welcome change of pace! Now I’m feeling ready to meet my inevitable end-of-year deadlines. 😆
.
.
Warmest wishes for the season, my friends! ❤️💛💙
Hi, I’m Heidi, the craft book author & maker beh Hi, I’m Heidi, the craft book author & maker behind Hands Occupied! 👋🏻 I’ve been enjoying making Reels a lot lately, but I wanted to bop in to share a regular photo & say hello. 🤓 
.
.
rather than giving you my bio right now, I have a question. I just got this new sweater & I can’t stop imaging how funny it would be to wear this to a knitting class ... is that bad? 🤣🤣🤣
.
.
Pictured: a blond woman with glasses wearing a sweater that reads “all your sweaters are ugly” standing in front of a Christmas tree.
Wet blocking, also called immersive blocking, is o Wet blocking, also called immersive blocking, is one of the most common methods for finishing a knitting project and helping ensure its final size and shape. Learn basic blocking for absolute beginners in an easy-to-follow (non-Reel!) video tutorial! Catch the tutorial on YouTube or the Hands Occupied Blog, link is in bio. 🧶 #handsoccupied #stopswatchandblockit #KPAmbassadorsDec20 #sponsored
Had to share this perfect capture of one of my fav Had to share this perfect capture of one of my favorite weird homemade Christmas ornaments: a simple macramé Santa face with beads for the eyes and nose! My Great-Grandma made it too. 🎄
.
Might have to try making a quickie Reel tutorial for this guy - I think it’s the perfect project for it, don’t you? 🎅🏼 #handsoccupied #macrame
Load More... Follow on Instagram

Copyright © 2021 / Foodie Pro Theme On Genesis Framework / Branding by Ink + Mortar
All Site & Shop Policies / Privacy Policy / Cookie Policy