• 0 items$0.00
  • Skip to primary navigation
  • Skip to main content
  • Skip to primary sidebar
  • Skip to footer

Hands Occupied

Colorful knitting, crochet, latch hook and macrame from craft book author & designer Heidi Gustad.

  • BLOG
    • Knitting
    • Crochet
    • Latch Hook
    • Macramé
    • Punch Needle
  • ABOUT
  • Shop
  • Nav Social Menu

    • Instagram
    • Pinterest
    • RSS
    • TikTok
    • YouTube

Tips for Bias Knitting

June 21, 2016 15 Comments

Tips for bias knitting - Learn how to knit diagonally or from corner to corner. It's super easy!

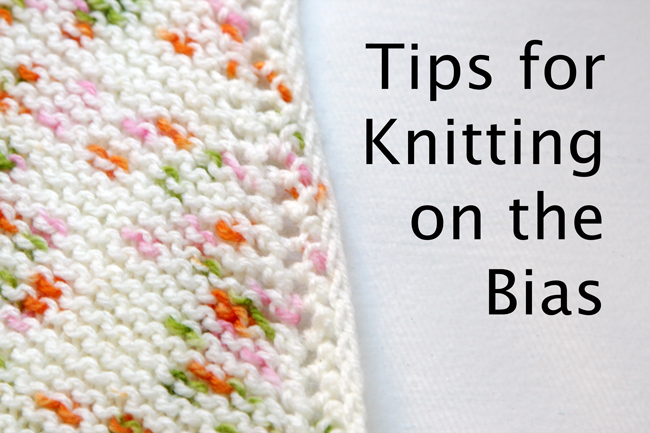
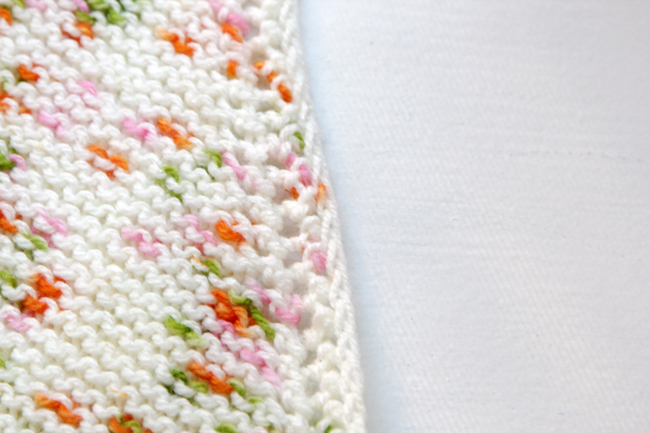
One of the designs I’m well into working on right now is bias knit. Bias knitting is when you are knitting something diagonally instead of side to side or up and down. As you can see in the photos here, the stitches in this swatch of knitting lie diagonally compared to their edging, so they’re an example of something that’s bias knit, a.k.a. knit on the bias. Just like in sewing, the term bias, at its most basic level, can essentially be understood as a synonym for diagonal.

Knitting diagonally - learn how to knit on the bias

Why knit on the bias? 

Bias knitting is an easy way to create a project with visual interest. The grain of your finished knit piece lies differently that one would expect from most traditionally knit projects. Stripes are amazing to play with in bias knitting because they can zig and zag all over your work in beautiful ways. If you’re a newer knitter in particular who’s nervous about playing with changing colors to play with stripes, never fear! That’s what variegated yarn is for. Let the built-in color changes of your yarn shine as you knit on the bias!

What sort of projects can you knit on the bias? 

For me, I really like bias knitting for creating flat pieces. Baby blankets, shawls, wraps, scarves and cowls (not coincidentally some of the most relaxing things to knit, no?) are all perfect for knitting diagonally.

How do I knit on the bias? 

It’s just a matter of where to place increases and decreases. If you want to knit a rectangle (i.e. a scarf), all you’ve got to do is increase along one side of your rectangle, while at the same time decreasing on the other side of the rectangle. Here’s a sample pattern for how to construct a rectangle on the bias: 

row 1. (RS) Work an increase near the beginning of the row (such as a M1, YO or kfb). Work a corresponding decrease (like a k2tog or ssk) near the end of the same row.

row 2. (WS) knit in pattern without increasing or decreasing.

PS: If you want your rectangle to slant the opposite direction from the pattern above, work the decrease at the beginning of the row and the increase at the end. Simple!

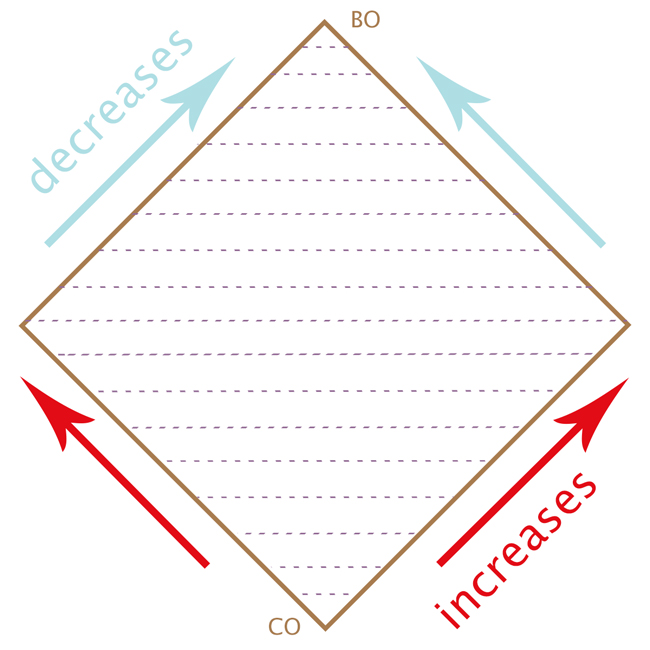
Let’s say you’re hoping to knit a square shape that is knit on the bias but the outline of the shape isn’t slanted like the piece would be above. For the first half of the project, you’ll need to work increases along both sides of your project until it’s at its widest point. Then, you’ll need to work decreases along both sides until you’ve finished forming the square. This graphic should help explain what I mean: 

How to knit a square on the bias

In the end, bias knitting is a fun way to cure garter or stockinette stitch boredom while still being able to knit relaxing projects. Bias knitting will literally turn your knitting on its head, resulting in beautiful, interesting-to-look-at fabric. Why not give it a try?

Have you done any bias knitting that you’d like to share? What’s your favorite bias knit project? 

Tips for bias knitting - Learn how to knit diagonally or from corner to corner. It's a super easy way to make high-impact projects!

Filed Under: Knitting, Knitting & Crochet Tagged With: bias knitting, decreases, diagonal knitting, how to knit on the bias, increases, tips for bias knitting, what is bias knitting

About Heidi

Heidi Gustad is a craft book author, designer & creator specializing in yarn crafts like knitting, crochet, latch hook & macramé. Her first book, Latch Hook: 12 Projects for the Modern Maker, is out now.

Previous Post: « Picks of the Week
Next Post: Throwback Thursday: Bijou Basin Ranch »

Reader Interactions

DID YOU LIKE THIS POST?
Visit similar articles...

  • Lifted Increases: How to Work RLI, LLI & When to Use ThemLifted Increases: How to Work RLI, LLI & When to Use Them
  • Peas & Carrots Baby BlanketPeas & Carrots Baby Blanket
  • Halloween Ideas!Halloween Ideas!
  • Scandinavian-Inspired Holiday DecorScandinavian-Inspired Holiday Decor

DON’T MISS ANOTHER UPDATE

Comments

  1. Heidi

    June 21, 2016 at 3:21 pm

    Love doing cotton dishcloths this way. Easy and quick, but look good too.

    Reply
  2. Lorene Frischknecht

    June 21, 2016 at 5:57 pm

    I knot on the angle quite frequently. I like it and it’s quite fun to see how the printed yarns turn out, too!

    Reply
  3. Denise Briese

    June 22, 2016 at 7:56 pm

    I loved to knit on the bias.. I also love to use varigated to knit baby blankets for charity. My question is.. and I have asked it countless times. How to make the ending corner look like the beginning. I gotten advice to slip the stitches, knit throu th back loops to no avail. I would love any tips you can give this has been my pet peeve for years.

    Reply
    • Heidi

      June 23, 2016 at 8:40 am

      It’s tough to get it perfect. In the current design I’m working on, I’m using a 3 stitch cast on for a more rounded corner combined with an edging that helps round out the corners as well. I know this is just a way to mask the lack of crispness, but it helps for symmetry freaks like me!

      Reply
  4. Elizabeth

    June 23, 2016 at 9:10 pm

    I always learn something new , thank you Heidi.

    Reply
  5. Pattymac

    June 25, 2016 at 11:30 am

    OOOO I love this! I’ve never tried anything like this. I’ll have to swatch with this concept when I finish up the scarf I’m currently knitting. Thanks for a great suggestion!

    Reply
  6. Margaret

    July 3, 2016 at 8:35 pm

    I always use a single or double crochet border on my bias knits, it helps finish up the awkward corner and it tames the stretchy edges just a bit so they aren’t so wild.

    Reply
  7. Elaine

    June 2, 2018 at 9:42 am

    First of all, outstanding explanations! I covet your communication skills. They are sweet and educational.

    I have also made bias knitted square washcloths and I’m wondering how to make a rectangle on the bias. For me, I prefer some crafts to be rectangle. I’m guessing increasing on one side while decreasing on the other. One way to find out, another washcloth. =)

    Reply
    • Heidi

      June 4, 2018 at 10:44 am

      Hi Elaine! You’ve got it – just increase on one side and decrease on the other. Take a look at my Big Old Bias Knit Scarf for an example of a rectangular object knit on the bias. :)

      Reply
  8. Terri Crawford

    August 20, 2019 at 10:21 am

    Your directions are easy to comprehend. However I make things hard for myself. I want to knit on the bias with a diagonal stitch. (sk 1 stitch ktb next stitch then knit in skipped stitch). any suggestions.

    Thank you

    Reply
    • Heidi

      August 26, 2019 at 9:46 am

      Hi Terri,

      I’d recommend beginning with a swatch of the stitch pattern to see if your stitch works out and is creating the shape you want. Then once you’re satisfied, you can cast on a larger project with confidence. :)

      Let me know if that helps!
      Heidi

      Reply
  9. Mon

    June 6, 2020 at 11:51 pm

    Hey there! I’ve used this method for a few hot plates and also for a baby blanket. I love the method, but my pieces come out more rhombus shaped. I tried blocking the blanket by clipping it onto a rug, spraying it with water, and leaving it overnight, but it’s still not quite right and I feel like it’ll go back to being really long if I wash it again. Any tips?

    Reply
    • Heidi

      June 8, 2020 at 10:00 am

      What pattern are you using?

      Reply
  10. Alice Brent

    May 3, 2021 at 1:14 am

    What would happen if you add a stitch at the end of the row as well as the beginning?

    Reply
    • Heidi

      May 10, 2021 at 4:11 pm

      It will be two stitches wider. Just be careful that your increases & decreases are happening in the same spot, and the pattern will otherwise be the same. :)

      Reply

Leave a Reply to Heidi Cancel reply

Your email address will not be published. Required fields are marked *

This site uses Akismet to reduce spam. Learn how your comment data is processed.

Primary Sidebar

Heidi Gustad from Hands Occupied / Craft Book Author and Knitting, Crochet, Latch Hook and Macrame Designer

Hi! I’m Heidi (she/her/hers), a craft book author & pattern designer specializing in knitting, crochet, latch hook & macrame. Really anything with yarn! ❤️  My work combines vintage and modern design elements, featuring bold colors and graphic motifs.

EMAIL NEWSLETTER

Never miss a tutorial with these short & sweet monthly updates.

Find Me on Social Media

  • Instagram
  • Pinterest
  • TikTok
  • YouTube
Latch Hook by Heidi GustadDiscover Unique Items

Footer

INSTAGRAM

handsoccupied

Craft book author, designer & creator specializing in yarn crafts like knitting, crochet, latch hook & macramé
❤️ Email preferred

Heidi Gustad 🧶✂️
If only knitting a whole project took 39 seconds… 😮‍💨 
.
In this video, you can see how the Intarsia Flower Pillow pattern knits up - two flat panels, one with intarsia, both are blocked, and then they’re seamed. Find the pattern on @hi.ravelry & my website, just search Intarsia Flower Pillow. 🌸 
.
P.S. I’m really smiling in this video while seaming the pillow, so I guess I’m proving last week’s claim that I truly enjoy that sometimes-dreaded task. 😆🫣
In knitting, a Left Lifted Increase (LLI) lets you In knitting, a Left Lifted Increase (LLI) lets you add a stitch in between two columns of stitches that leans to the left. Similar to an M1L, LLIs allow you to increase nearly invisibly.
.
To learn more about lifted increases, including when to use them and how they differ from Make 1s, head to the 🔗 in my profle. 
.
Have you ever used lifted increases? I used M1’s almost exclusively for a long time when I needed to inc between stitches, but when I designed the Intarsia Flower Pillow pattern, I needed something that would allow me to increase a lot near my cast on, and M1’s resulted in edge curling. The more you know! 🌈 
.
Yarn: @lionbrandyarn Wool Ease from my Stash / Neddles: @boyeyarncrafts - Just remembered these are the needles I learned to knit on at age 8. 😂
.
#handsoccupied #knitting #learntoknit #howtoknit #sweaterknitting #knitinspiration #knittersofinstagram #liftedincreases
Last week I got to hang out with my family & helpe Last week I got to hang out with my family & helped babysit my red-headed niece and nephew. So here’s some plane knitting, and a couple pictures (shared with permission) of my babysitting adventures.
.
Lessons learned: 1️⃣ Trying to knit around 2 toddlers, 2 cats & 2 large dogs is pretty hard. 2️⃣ I learned during water color time that pink and black make “colorful black.” 🩷🖤 3️⃣ Toddlers do NOT care about your rainbow sorting of their toys. 4️⃣ Toddlers are very good at finding mischief in a very short amount of time, what a surprise. 😂
.
#handsoccupied #knitting #placesyoucanknit #knitters #knitinpublic #handmadelife #knitting_inspiration
Weaving in ends & seaming with mattress stitch are Weaving in ends & seaming with mattress stitch are both so useful for garment knitting! But for me, weaving in ends can feel like a chore while the latter feels like I’ve successfully done magic. 🧙🏻‍♀️ Does anybody else run into this phenomenon? Are you the opposite? Any theories as to why they feel different? 
.
In this video, I’m finishing my brand new Intarsia Flower Pillow. 🌸 I’m working with @universal_yarn Uni Merino & the pattern is available at the 🔗 in my b1o. 
.
#handsoccupied #intarsiaflowerpillow #intarsia #intarsiaknitting #knitting #colorwork #knitpillow #knittinginspiration #knittersofinstagram
I independently released a knitting pattern today, I independently released a knitting pattern today, my first in 5 years! The Intarsia Flower Pillow is a 16” (40cm) round pillow knit with an intentional combination of intarsia, stockinette, garter and seed stitch. This pillow has everything you need to level up your intarsia technique while also knitting something you can use. 
.
This pillow allows you to practice knitting intarsia while simultaneously increasing and decreasing. The Intarsia Flower Pillow pattern was designed to be a little knit-nerdy for learning and a little cute, arming you with many of the skills you'd need to knit an intarsia sweater. 
.
Intarsia Flower Pillow is available in the Hands Occupied Sh0p and on @hi.ravelry . You can read more about the pattern on the bl0g, the🔗 are where you’d think.
. 
YARN: @universal_yarn Uni Merino in Antiquity, Fjord and Conch / NEEDLES: US 2 (2.75 mm) / PATTERN: Intarsia Flower Pillow by Heidi Gustad
Load More... Follow on Instagram

Copyright © 2023 / Foodie Pro Theme On Genesis Framework / Branding by Ink + Mortar
All Site & Shop Policies / Privacy Policy / Cookie Policy