• 0 items$0.00
  • Skip to primary navigation
  • Skip to main content
  • Skip to primary sidebar
  • Skip to footer

Hands Occupied

Colorful knitting, crochet, latch hook and macrame from craft book author & designer Heidi Gustad.

  • BLOG
    • Knitting
    • Crochet
    • Latch Hook
    • Macramé
    • Punch Needle
  • ABOUT
  • Shop
  • Nav Social Menu

    • Instagram
    • Pinterest
    • RSS
    • TikTok
    • YouTube

How to: Ribbon Wall

February 2, 2011 1 Comment

Many months ago, I was spending a lot of time figuring out what exactly I wanted my wedding to look like. I’m not a very traditional person, other than the whole getting married at 23 thing. There will be no bridesmaids, religion, garter belts, flowers, cake or bouquet throwing to be had at my nuptials (and please don’t try to convince me otherwise – believe me, I’ve heard it all). As I found some elements I liked across the web, I realized projects involving ribbon always caught my eye. I decided to Google “wedding ribbon wall” to see if anyone had ever made an entire wall out of ribbon, and guess what? A bunch of people did, and they look really cool.
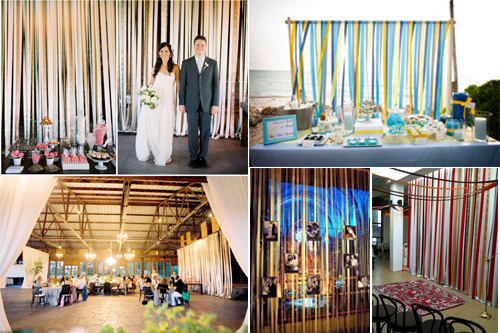
 

I toyed with the idea of incorporating a ribbon wall in to my ceremony arch, but settled on using the ribbon wall for a photo booth backdrop (I also used the wall as the background for a how to video I recently shared). Putting this together was super simple.

Suppiles

2 48″-long dowels, 7/8″ thick

spray paint (optional)

sewing machine/needle and thread/liquid stitch (choose one)

several yards of ribbon in whatever colors, widths, etc. you want

Directions

Spray paint your dowels and set them aside to dry (optional).

For my wall, I cut my ribbon in to pieces 6.5 feet long. Since I used ribbon ranging in width from 7/8 to 1.5 inches, I did a little math to see how many pieces I would need to cover the 48-inch wide dowel. I ended up needing about 6 pieces of each of the 6 types of ribbon I was using.

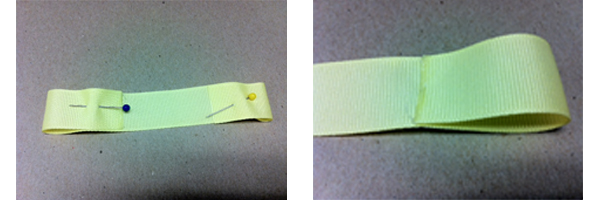
The reason the pieces need to be 6-and-a-half feet long is to accommodate this next step. Fold over each end of a piece of ribbon 1.5 inches and pin in place. Make sure the side you’ll want hidden is facing the same direction on each end of your ribbon. Using your preferred method of sewing, sew your ribbon in place. Repeat this process until all of your ribbon pieces are sewn.
After your dowels are completely dry, string your ribbons on them. Even though I knew I could get away with just one dowel, I used two because I’ll need to transport my ribbon wall in a car. I wanted to be able to roll up my wall like a scroll and unroll it just as easily the day I decorate my wedding venue. For now, here’s the fiance mugging it up in front of our future photobooth backdrop.

Filed Under: DIY Wedding, How-to, Sewing Tagged With: charity wedding, photo booth, ribbon wall

About Heidi

Heidi Gustad is a craft book author, designer & creator specializing in yarn crafts like knitting, crochet, latch hook & macramé. Her first book, Latch Hook: 12 Projects for the Modern Maker, is out now.

Previous Post: « My Bridal Shower!
Next Post: How-to: Wedding Fascinator »

Reader Interactions

DID YOU LIKE THIS POST?
Visit similar articles...

  • Weekly ReaderWeekly Reader
  • Picks of the WeekPicks of the Week
  • Weekly ReaderWeekly Reader
  • A Farewell to the Studio Space, but Not Hands OccupiedA Farewell to the Studio Space, but Not Hands Occupied

DON’T MISS ANOTHER UPDATE

Trackbacks

  1. Recycled Ribbon Trivet – Tutorial – Hands Occupied says:
    April 22, 2013 at 12:02 am

    […] me as I spent most of last week stuck at home due to Chicago flooding. I finally disassembled the ribbon wall photo booth backdrop from my wedding and found myself with a bunch of 70 inch pieces of ribbon, mostly grosgrain ribbon […]

    Reply

Leave a Reply Cancel reply

Your email address will not be published. Required fields are marked *

This site uses Akismet to reduce spam. Learn how your comment data is processed.

Primary Sidebar

Heidi Gustad from Hands Occupied / Craft Book Author and Knitting, Crochet, Latch Hook and Macrame Designer

Hi! I’m Heidi (she/her/hers), a craft book author & pattern designer specializing in knitting, crochet, latch hook & macrame. Really anything with yarn! ❤️  My work combines vintage and modern design elements, featuring bold colors and graphic motifs.

EMAIL NEWSLETTER

Never miss a tutorial with these short & sweet monthly updates.

Find Me on Social Media

  • Instagram
  • Pinterest
  • TikTok
  • YouTube
Latch Hook by Heidi GustadDiscover Unique Items

Footer

INSTAGRAM

handsoccupied

Helping yarn crafters untangle various techniques on the internet since 2010
🧶 Really into intarsia
Stay up-to-date 💌 & shop the latest patterns ⤵️

Heidi Gustad 🧶 knitting & yarn crafts
Wow! I am floored by the awesome response to the S Wow! I am floored by the awesome response to the Spiral Hill Sweater Vest. Thank you. 🙏🏻❤️ If you love this pattern & didn’t know already, we are going to be doing a knit along (KAL) from October 1-29 featuring this spooky sweater vest & lots of tutorials, especially for the intarsia part. 
.
Later today my newsletter will be coming out with additional Knit Along details, so if you’re not already signed up, now is a great time - the 🔗 is in my b1o. 
.
Pictured: My Spiral Hill Sweater Vest pattern from the new Nightmare Before Christmas knitting book by @tanisknits. Model is wearing size 1 with 2” of positive ease, knit in @brooklyntweed Imbue Worsted. Vest images via @insighteditions 
.
#spiralhillsweatervest #handsoccupied #nightmarebeforechristmasknittingbook
At long last! I can share the Spiral Hill Sweater At long last! I can share the Spiral Hill Sweater Vest, my contribution to the new book Disney Tim Burton’s Nightmare Before Christmas: The Official Knitting Guide to Halloween Town and Christmas Town, out now! 🎃💀 
.
I’m hosting a knit along (KAL) October 1-29 for anyone who’d like to knit this vest along with a group & learn a little about intarsia while we’re at it. I’ve got weekly tutorials planned to help you knit this worsted weight sweater vest, and there’s a prize package giveaway at the end for KAL participants too. Details are on my site - you know where to find the 🔗 I think. 😉
.
Book by @tanisknits 
Publisher @insighteditions 
Yarn @brooklyntweed Imbue 
Find it wherever fine books are sold. 
.
#handsoccupied #nightmarebeforechristmas #intarsia #sweatervest #knittingpattern #knittingbook #spiralhill #knitting_inspiration #knitting
Since there was some interest in stills of my WIPs Since there was some interest in stills of my WIPs closet after this weekend’s quick tutorial, here are few. ✂️ The tutorial is one post back in my feed as a video.
.
As you can see, I didn’t worry about the wire hangers all being perfectly uniform, but it doesn’t matter to me. Also, this closet holds a lot! Despite that, it is already at capacity. Since the hanging bags don’t appear to be recyclable, I want to reuse them as long as possible. Who knows, maybe this will be a way to limit my WIPs? 😅
.
P.s. In the third photo you can see how I use this system to store the original swatches, scraps, yarn ball bands, & notes from a design project all together. 
.
#handsoccupied #wips #craftstorage #yarnstorage #yarncrafts #knitting_inspiration #craftstudio #craftroom #craftcloset
How to convert a closet into WIPs storage with jus How to convert a closet into WIPs storage with just a few supplies ✂️
.
When I was a librarian, we would use these hanging bags to circulate books with audiobook CDs. They came to mind when I wanted to develop a filing cabinet-like system for my differently-sized WIPs. To fit in my studio closet, a standard bedroom closet, they just needed custom hangers. 🤙🏻 
.
HOW TO MAKE THE HANGERS
1. Carefully cut approx. a 9” (23 cm) length of flexible 3 mm aluminum wire.
2. Near the end of a large knitting needle or dowel, wrap the wire around it as you would a twist tie. 
3. Bend the other end into a hook shape, perpendicular to the circle shape you just created. 
4. Hang like a hanger in a closet, as shown. 
.
#handsoccupied #handmadelife #knitting_inspiration #craftcloset #craftroom #craftroomorganization #craftroomstorage #craftroomdecor #crocheter #latchhook #knittersofinstagram #wip #wips #hangingstorage
It’s time for the monthly review and giveaway! T It’s time for the monthly review and giveaway! This go around, get to know two new sister yarns from @manosyarnsusa, Marla and Sami, and enter to win a skein of each to try for yourself. 
.
What makes these yarns sisters is that, while dyed differently, they’re the same weight and come in intentionally coordinating color palettes. For my review, I opted for a sky-inspired combo of Sami in Natural and Marla in Nube. 🌧️ 
.
Check out the full review & enter the giveaway at the link in my bio. 
.
#handsoccupied #yarnreview #manosdeluruguay #knitting_inspire #crochet #yarngiveaway #knitters #yarn #crochetersofinstagram
Load More... Follow on Instagram

Copyright © 2023 / Foodie Pro Theme On Genesis Framework / Branding by Ink + Mortar
All Site & Shop Policies / Privacy Policy / Cookie Policy